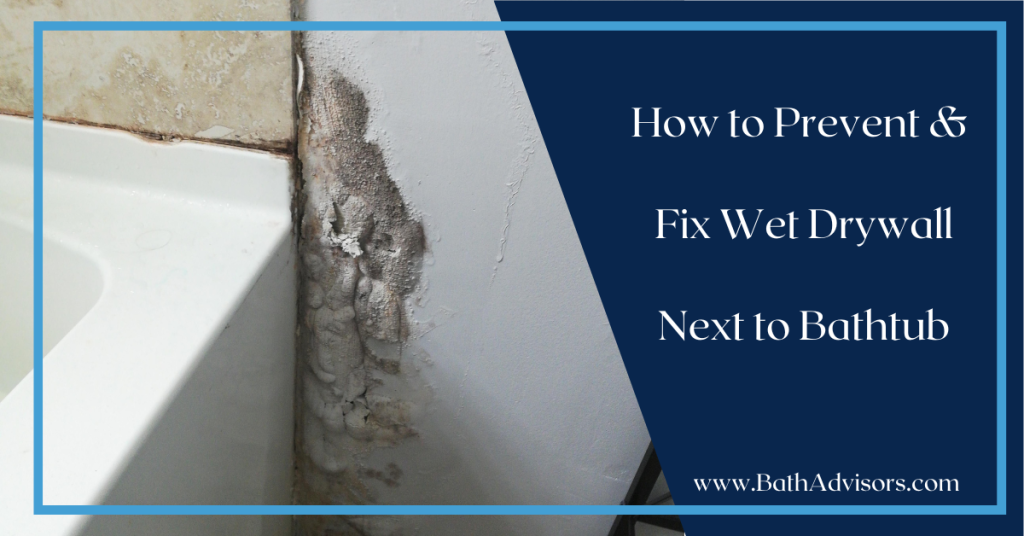
Wet drywall next to a bathtub can be a frustrating and potentially serious issue for homeowners. Not only does it look unsightly, but it can also lead to mold growth, structural damage, and costly repairs if left untreated. Understanding the common causes of wet drywall near bathtubs and knowing how to prevent and fix it is essential for maintaining a dry, safe, and healthy bathroom environment.
In this comprehensive guide, we will delve into the various reasons why drywall becomes wet near bathtubs and provide step-by-step solutions to address each issue. Whether it’s faulty caulking, plumbing leaks, or inadequate ventilation, we’ve got you covered with effective tips to prevent moisture damage and restore your bathroom to its former glory.
Common Causes of Wet Drywall Next to a Bathtub
Faulty Caulking:
Faulty caulking is one of the most common culprits behind wet drywall near bathtubs. Over time, caulk can deteriorate, crack, or peel away, creating gaps and openings that allow water to seep through. When water penetrates these gaps, it can infiltrate behind the drywall, leading to moisture accumulation and potential damage.
Plumbing Leaks:
Undetected plumbing leaks can wreak havoc on your bathroom walls, including the drywall adjacent to the bathtub. Leaking pipes within the walls or under the bathtub can gradually saturate the drywall, causing it to become discolored, soft, and eventually leading to mold growth.
Condensation and Poor Ventilation:
When warm, moist air from showers and baths comes into contact with cooler bathroom surfaces, condensation occurs. If your bathroom lacks proper ventilation, this excess moisture can accumulate on the drywall next to the bathtub, creating a conducive environment for mold and mildew growth.
Water Splash and Spillage:
Water splashes and spillage during showers or baths can occur if there is no proper barrier between the bathtub and the surrounding area. This can cause water to reach the adjacent drywall, especially if the bathtub has a high, shallow design or lacks a shower curtain or splash guard.
How to Prevent Wet Drywall Near Bathtubs
Proper Caulking Techniques:
To prevent water from seeping behind the bathtub and wetting the drywall, ensure that the caulking around the bathtub is applied correctly. Choose a high-quality silicone caulk specifically designed for bathrooms, as it is waterproof and flexible. Remove any old or damaged caulk and thoroughly clean and dry the area before applying the new caulk. Be sure to fill all gaps and joints between the bathtub and the surrounding walls or floor to create a reliable water seal.
Regular Inspection and Maintenance:
Perform regular inspections of the bathroom and bathtub area to identify any signs of wear, damage, or water seepage. Check the caulking, grout, and plumbing for any issues. Promptly address any leaks or water-related problems as soon as you notice them to prevent further damage to the drywall and surrounding structures.
Installing a Splash Guard:
Consider installing a splash guard, especially if your bathtub has a design that allows water to escape easily. Splash guards are affordable and easy to install, and they act as a physical barrier to prevent water from splashing onto the drywall. They come in various materials and styles, ensuring there is an option that complements your bathroom décor.
Step-by-Step Guide to Fix Wet Drywall Near Bathtubs:
Tools Needed to Replace and Repair Drywall:
- Utility Knife: A sharp utility knife is essential for cutting out damaged drywall sections and making precise cuts during the repair process.
- Drywall Saw: A drywall saw or jab saw is used to create larger openings in drywall and is particularly useful for cutting around electrical boxes or other fixtures.
- Screwdriver: You’ll need a screwdriver to remove screws from the damaged drywall and to secure new drywall pieces in place.
- Drywall T-Square: A T-square helps in drawing straight and accurate lines on the drywall for cutting, ensuring precise fits for patching or replacement.
- Drywall Rasp: A drywall rasp is a tool used to smooth the edges of cut drywall and remove any rough spots before patching.
- Drywall Joint Knife: Also known as a taping knife, this tool is used for spreading joint compound over seams and screw holes, creating a smooth finish.
- Drywall Mud Pan: A mud pan is a flat, shallow tray used to hold joint compound while applying it with the joint knife.
- Sanding Block or Sandpaper: For smoothing and finishing the patched or repaired areas, you’ll need a sanding block or sandpaper of appropriate grit.
- Drywall Screws: Drywall screws are essential for attaching new drywall patches to the wall studs or existing drywall.
- Drywall Mesh Tape or Paper Tape: Drywall tape reinforces seams and joints, preventing cracks from forming after patching or repairs.
- Drywall Joint Compound: Also known as mud, joint compound is used to fill gaps, seams, and screw holes and create a seamless finish.
- Level: A level ensures that the repaired or replaced drywall is flush and even with the surrounding area.
- Stud Finder: A stud finder helps locate wall studs, enabling you to secure the new drywall patches to a stable surface.
- Safety Gear: Wear safety glasses, a dust mask, and gloves to protect yourself from potential hazards during the repair process.
- Drop Cloth or Plastic Sheeting: Cover the surrounding area with a drop cloth or plastic sheeting to catch dust and debris and protect floors and fixtures.
- Caulk Gun: If you need to reapply caulk around the bathtub or other areas, a caulk gun is essential for precise application.
- Paint and Paintbrushes: After completing the drywall repairs, you may need paint and brushes to touch up the patched areas to match the existing wall color.
- Joint Compound Mixer: A joint compound mixer, either manual or powered, helps achieve a smooth and consistent texture when mixing the joint compound.
Having these tools on hand will enable you to effectively replace and repair damaged drywall, ensuring a professional-looking and long-lasting result.
Identifying the Source of Moisture:
Before addressing the wet drywall issue, it is crucial to identify the source of moisture. Inspect the bathtub area thoroughly for any visible leaks or water damage. Check the caulking for gaps or signs of deterioration. If there are no apparent issues, consider the possibility of condensation due to poor ventilation. If you can’t identify the source, it’s best to consult a professional plumber or contractor for further investigation.
Drying Out Wet Drywall:
Once you’ve identified the source of moisture and fixed any leaks or plumbing issues, it’s essential to dry out the wet drywall. Use fans or dehumidifiers to facilitate air circulation and moisture evaporation. If the drywall is significantly saturated, it might be necessary to remove a section of the damaged drywall to allow better access for drying.
Repairing or Replacing Damaged Drywall:
If the drywall has suffered severe water damage or shows signs of mold growth, it may require repair or replacement. Carefully cut out the affected section of the drywall using a utility knife. Ensure that the surrounding drywall is dry and mold-free before proceeding. Patch the area with a new drywall piece, securing it in place with drywall screws and joint compound. Smooth the surface with sandpaper, and apply a thin layer of joint compound over the patch to blend it with the existing wall.
Reapplying Caulk and Waterproofing:
After the repaired drywall has dried completely, reapply caulk around the bathtub using proper caulking techniques as mentioned earlier. Make sure the caulk is evenly applied and covers all gaps and joints to create a watertight seal. Consider using a mildew-resistant silicone caulk to provide added protection against mold growth. Additionally, inspect and reseal any other areas in the bathroom that require waterproofing, such as around the showerhead and faucet handles.
By following these steps and taking preventive measures, you can ensure that wet drywall near your bathtub becomes a thing of the past. Taking timely action to address water-related issues and maintaining a dry and well-ventilated bathroom will not only preserve the aesthetics of your bathroom but also safeguard your home from potential structural damage and health hazards associated with mold growth.
FAQs
Q1: How can I tell if the wet drywall near my bathtub is caused by a plumbing leak?
A: One of the signs of a plumbing leak is consistently damp or wet spots on the drywall. You may also notice water stains, musty odors, or an increase in your water bill. To confirm a plumbing leak, turn off all water fixtures and appliances in your home, check your water meter, and monitor it for any changes. If it continues to increment without using any water, it’s likely a plumbing leak.
Q2: Can I fix wet drywall myself, or do I need to hire a professional?
A: The extent of the damage and the cause of the wet drywall will determine whether you can handle the repairs yourself. For minor issues like small water splashes, you can often fix it with simple DIY techniques. However, if there are significant water stains or the damage is extensive, it’s best to consult a professional to ensure a proper and lasting repair.
Q3: How can I prevent condensation and poor ventilation near my bathtub?
A: Proper bathroom ventilation is crucial to prevent condensation and moisture buildup. Ensure your bathroom has a vent fan installed, and run it during and after showers to expel humid air. Additionally, leave the bathroom door open to allow air circulation and consider using a dehumidifier if necessary.
Q4: Can I use ordinary caulk for sealing the bathtub, or do I need a specific type?
A: For sealing the bathtub, it’s essential to use a high-quality silicone caulk specifically designed for bathrooms. Silicone caulk is waterproof and flexible, ensuring a durable and long-lasting seal that can withstand the constant exposure to water and moisture.
Q5: How do I know if the drywall needs replacement instead of repairs?
A: If the drywall is severely water-damaged, sagging, or showing signs of mold growth, it’s best to replace the affected area altogether. Repairing extensively damaged drywall may not provide a lasting solution, and replacement will ensure a stable and dry surface.
Final Thoughts
Dealing with wet drywall next to a bathtub may seem daunting, but armed with the right knowledge and techniques, you can prevent and fix the issue effectively. Regular maintenance, proper caulking, and vigilant inspection can go a long way in preserving your bathroom’s integrity and preventing moisture-related problems. Remember to act promptly if you notice any signs of water damage, as early intervention can save you from costly repairs down the road. By following the steps outlined in this guide and seeking professional help when necessary, you can keep your bathroom dry, beautiful, and free from wet drywall concerns.